What Is an AI Tattoo Generator? How It Works and Its Limits
Learn what an AI tattoo generator is, how it turns text prompts into design ideas, what style controls can do, and how AI fits into a real tattoo workflow.
What is an AI tattoo generator?
An AI tattoo generator turns a written idea into an image you can use to plan a tattoo. Describe a subject, such as a ginkgo branch with a crescent moon, and the tool creates a design concept. You can then decide what you like and bring the image to a tattoo artist to discuss placement, size, and changes.
The useful part is having something to point at. “I want a delicate botanical tattoo” leaves a lot open to interpretation. An image lets you say, “Keep these leaf shapes, but remove the stars and leave more space between the lines.”
TatSketch currently creates standalone design images from text. It offers six style presets: Black & Grey Illustrative, Illustrative Blackwork, Japanese, Traditional, Watercolour, and Fine line. It does not place your design on a photo of your body or prepare a tattoo stencil. Those are different tasks.
A concept, a mockup, and a stencil serve different purposes
A picture of a tattoo design and a picture of that design on an arm answer different questions. Neither automatically gives the artist a stencil.
- A design concept helps you choose the subject, shading, and arrangement. The final dimensions and body fit are still open to discussion.
- A body-placement mockup shows an idea in a location such as an arm or shoulder. It does not establish accurate scale, wraparound fit, or what the finished tattoo will look like.
- A tattoo stencil transfers the agreed design's outlines onto the skin as a guide while tattooing. The artist prepares and applies it for the actual placement and their working method.
TatSketch's homepage includes body-placement illustrations to show ideas in context. These are illustrative images, not photographs of completed tattoos or evidence of a body try-on feature.
A clean black design on a white background is still a concept image. To make a stencil, the artist may redraw it, simplify details, or separate the outlines they need to transfer onto the skin.
How does an AI tattoo generator work?
You write a description, choose the available settings, and generate an image. Then you compare the result with what you asked for.
Start with a subject and a layout. Here is the description used in the TatSketch test shown later in this article:
A ginkgo branch with three fan-shaped leaves, accompanied by one small crescent moon and sparse star and dot accents. Integrate the branch and accents as a balanced, delicate composition.
This gives you things you can check: three leaves rather than a whole tree, one moon, and only a few accents. If an element matters, name it. Adding more adjectives does not guarantee a closer result.
Choose settings that match the image you want to explore. In TatSketch, these controls have separate jobs:
| Setting | What it changes |
|---|---|
| Style | Adds visual guidance, such as Fine line or Japanese. Check the result against the look you want. |
| Generation model | Chooses the image model that handles your request. You still describe the subject and layout. |
| Aspect ratio | Sets a square, portrait, or landscape canvas. It does not set tattoo dimensions in centimeters. |
| Resolution | Requests an output size. Check the returned image's actual pixels and details. |
The free generation uses Standard, a square 1:1 canvas, and the 1K setting. Other choices depend on the plan. In the current interface, 4K also requires a portrait or landscape canvas.
Generate, inspect, then decide what to change. The model interprets the words and settings to make an image; it is not following a measured drawing. Some image models begin with random visual noise—like a screen full of scattered dots—and gradually form a picture guided by the description. The latent diffusion paper explains one such approach; image models do not all work the same way.
In TatSketch, changing the description and generating again creates a new image. It does not edit just one part of the previous result while preserving everything else. The same words can produce a different result, and each new generation uses your free allowance or credits. Save the version you like before exploring another.
What do style presets actually change?
A preset adds style instructions to your description. You still supply the subject; the preset supplies additional guidance about how to draw it.
TatSketch starts a fresh design with Black & Grey Illustrative selected. Choose No style if you want your description sent without TatSketch's added style instructions.
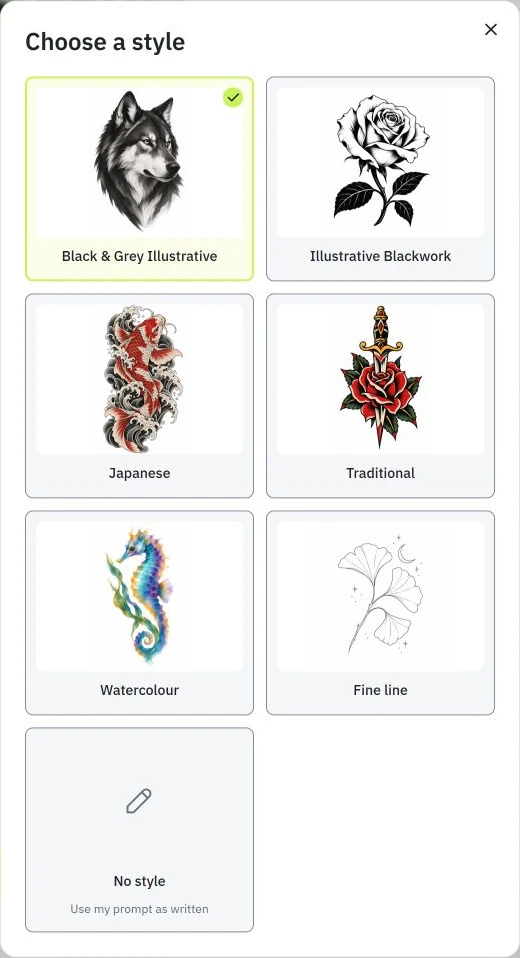
For the ginkgo description, selecting Fine line adds that preset's guidance to the request. Changing to Japanese changes the guidance sent with it. You would still inspect the new image rather than assume the preset produced exactly the look you wanted.
This is different from training a model, which uses data to develop or adjust the model's capabilities. Selecting a preset supplies instructions for the current image. The presence of a style menu does not tell you how a model was trained, and it is not evidence that each menu option has its own specially trained model.
What can AI help you explore? A real TatSketch example
We ran one generation test on September 16, 2026, using the ginkgo description above, TatSketch's Fine line preset, Standard model, 1:1 aspect ratio, and 1K resolution setting. The returned image was 1,254 × 1,254 pixels. This was a test of TatSketch's generation service, not a separate illustration made for this article.
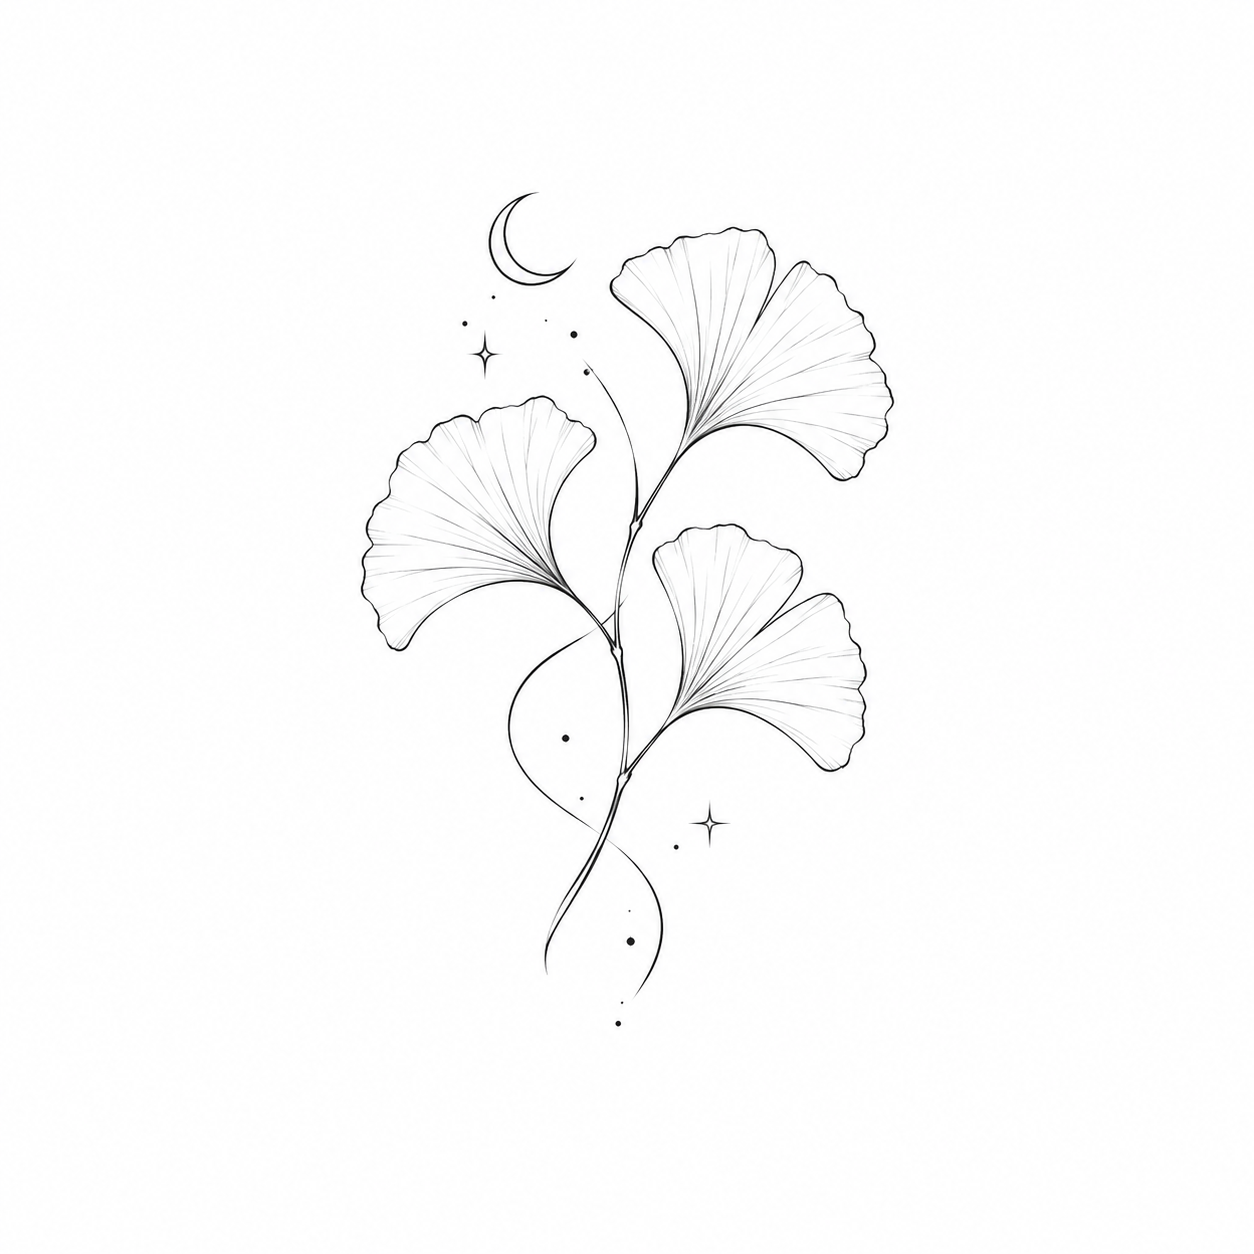
The result gives us a useful starting point, but “looks delicate” is too vague a review. Here is what we can actually see:
- The leaf count is right: three fan-shaped leaves at different heights. We could keep this arrangement or ask for a more compact cluster.
- The accents need a preference decision: the moon is above the leaves, while stars and dots extend through the design. Do they add meaning, or would the branch be stronger on its own?
- The detail needs a size discussion: there is open space around the branch, but many closely spaced veins inside each leaf. Those are the lines to review with the artist at the intended tattoo size.
This is where an AI tattoo design helps: you can choose a direction and explain your preferences more precisely. You might write a new description asking for fewer leaf veins and no star accents. That would be a request for another version, not a promise to preserve the existing outlines.
Notice the difference between image dimensions in pixels and tattoo size on skin. The 1K setting returned 1,254 × 1,254 pixels in this test. Neither number tells you whether all those veins suit a five-centimeter tattoo. To explore physical size, print the subject at your intended height, measure the design itself rather than the white page border, and discuss it with your artist.
What still needs a tattoo artist's judgment?
The artist turns the visual idea into a design for your body. That includes deciding which details to redraw, how much space to leave, and how the composition fits the placement.
Tattoo artist Brian Ulibarri describes problems he has encountered with AI references, including crowded detail, distorted body proportions, and sleeve concepts that fill only the outside of an arm. He also uses AI to create reference elements, which he combines and redraws. That is one artist's account of his process, not a claim that all artists work the same way.
Use this checklist before your consultation:
Names, dates, and lettering
- Check yourself:
- Read every character for misspellings, repeated letters, missing strokes, and incorrect dates. Supply the exact wording separately from the image.
- Ask the artist:
- Which font, spacing, and size would work for this text? Does it need redrawing?
Complex details and overlapping shapes
- Check yourself:
- Follow each outline. Mark unclear joins, extra parts, and lines that stop unexpectedly. In the ginkgo example, look where the leaf veins converge and the stems meet. For symmetrical patterns, compare corresponding parts too.
- Ask the artist:
- Which outlines should be redrawn, and which details can be removed? Does the pattern need reconstructing?
Small designs with dense detail
- Check yourself:
- Print at the intended size and check with a ruler. Does the main shape remain easy to read?
- Ask the artist:
- Bring your proposed width and height in centimeters. Discuss line spacing and how much you can simplify or enlarge the design.
Sleeve and torso mockups
- Check yourself:
- Does the picture show only one angle? Identify what is missing on the inside, back, or around a joint.
- Ask the artist:
- How will the design connect around your body? Mention existing tattoos and areas you want left open.
High-resolution images on a white background
- Check yourself:
- Zoom in for broken lines, stray marks, and unclear overlaps. A white background makes these easier to inspect; it does not remove them.
- Ask the artist:
- Which parts are useful references, and what needs redrawing before a stencil can be prepared?
For a sleeve, one attractive front view is not a complete plan. Ask about the inner arm and transitions around the elbow as well as the main outward-facing image. Measurements or photographs may help; let the artist tell you what they need.
How to use the result in a tattoo consultation
Ask whether the artist accepts AI references before sending a collection of images. If they do, choose the most useful concept and attach a short note. You can copy and fill in this format:
Idea: Ginkgo leaves with a small crescent moon.
Keep: The three-leaf arrangement and open space around the branch.
Change: Fewer leaf veins; remove the stars and dots.
Placement: [Body area, including any nearby existing tattoos.]
Size: [Width × height in centimeters, and how flexible you are.]
Exact lettering: [Paste the text, or write “none.”]
Reference: This image is AI-generated. I would like you to adapt it for the placement and size.
Send the clearest file you have, rather than a screenshot of the whole website. TatSketch shows the original and download dimensions so you can tell which file you are sharing. Free preview downloads are watermarked and limited to 512 pixels on the longest side. An active subscription unlocks originals, including earlier saved free designs; designs generated before the subscription expires retain original-download access afterward. The plans and download options explain what is included.
Your image and notes give the artist a brief: what the tattoo means to you, what you like, and what is still open to change. You do not need to resolve every line before that conversation.
For a step-by-step process, read how to design a tattoo, from choosing references and placement to refining a concept with your artist.
To explore a concept of your own, describe your tattoo idea in TatSketch.